Klipper on FlashForge Creator Pro 2
A step-by-step guide to installing Klipper firmware on a FlashForge Creator Pro 2.
This guide documents the process of installing Klipper firmware on a FlashForge Creator Pro 2 3D printer.
Based on the guide at https://wiki.evilazrael.de/en/flashforge-creator-pro-2, this version includes additional details and clarifications for first-time Klipper users. It is something between Evil’s “Basic” and “Advanced” configurations.
Prerequisites
ST-LinkV2 Programmer
A ST-LinkV2 programmer is required to flash the firmware. This device can program (and debug) STM32 microcontrollers:
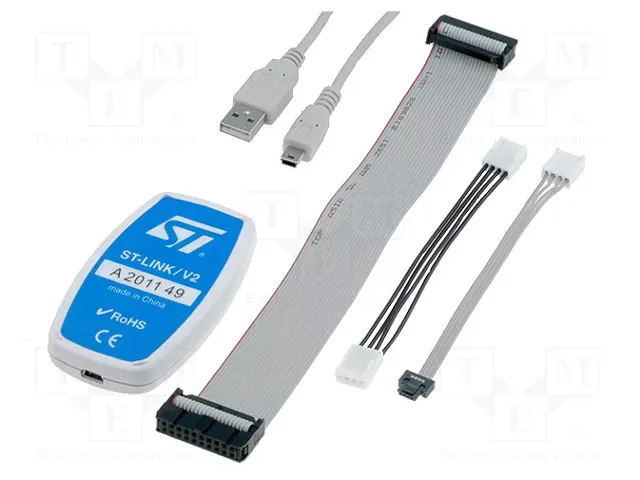
These cheap clones are available on AliExpress for approximately 5€. Example: https://www.aliexpress.com/item/1005007096805623.html
STM32CubeProgrammer software
In order to flash the firmware onto the printer’s mainboard, you’ll need to install STM32CubeProgrammer on your computer. You can download it from STMicroelectronics’ website: https://www.st.com/en/development-tools/stm32cubeprog.html
Host Device for Klipper
Klipper is composed of two parts: the firmware running on the printer’s mainboard, and a host software that runs on a separate device and communicates with the printer.
For this host device, you can use a Raspberry Pi or any other computer that can run Python. I am using a Raspberry Pi 4.
Preparing the Raspberry Pi and Building the Firmware
Step 1: Install Klipper on the Raspberry Pi
The most common approach for installing Klipper is to use a pre-configured OS image that includes Klipper and useful tools (like web GUIs). Popular options are Fluidd and MainsailOS. I used MainsailOS, mostly because Evil also used it in his guide.
You can download MainsailOS directly onto a Raspberry Pi SD card using Raspberry Pi Imager. See https://docs-os.mainsail.xyz/getting-started/raspberry-pi-os-based for more details.
Step 2: Switch to Evil Azrael’s Klipper Fork
Important: The official Klipper version doesn’t yet support the FlashForge Creator Pro 2. We need to use Evil Azrael’s fork until the PR is merged. Link to PR: https://github.com/Klipper3d/klipper/pull/6553
SSH into the Raspberry Pi:
Find your Raspberry Pi’s address:
- Check your router’s admin interface for the IP address, or
- Use the hostname (default:
mainsail, but can be changed in Raspberry Pi Imager. Mine ispi-3dprinter)
Example SSH command:
ssh pi@pi-3dprinter # Replace with your hostname or IP. Note that you can change the username in the Raspberry Pi ImagerSwitch to Evil’s Fork:
The MainsailOS installation includes the official Klipper repository at ~/klipper. Update the remote URL and fetch Evil’s fork:
cd ~/klipper
git remote set-url origin https://github.com/eazrael/klipper.git
git fetch
Checkout the FFCP2 Branch:
Two branches are available: ffcp2_basic and ffcp2. Use ffcp2 as it’s more up-to-date:
git checkout ffcp2Step 3: Build the Firmware
Configure the Build:
From the ~/klipper directory, launch the configuration menu:
make menuconfigTroubleshooting: If you encounter locale errors, run:
sudo dpkg-reconfigure localesSelect
en_US.UTF-8and try again.Reference: https://stackoverflow.com/questions/14547631/python-locale-error-unsupported-locale-setting
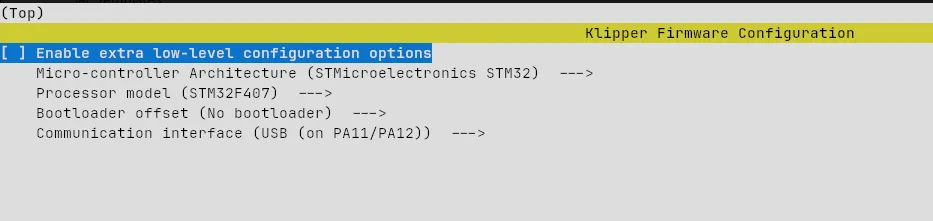
Required Configuration Settings:
| Setting | Value |
|---|---|
| Micro-Controller Architecture | STMicroelectronics STM32 |
| Processor model | STM32F407 |
| Bootloader offset | No bootloader |
| Communication interface | USB (on PA11/PA12) |
Save the Configuration:
- Press
Qto exit - Press
Yto save
Build the Firmware:
makeThe build process takes a few seconds and outputs the firmware to ~/klipper/out/klipper.bin.
Once done, copy klipper.bin to the computer where you’ll run STM32CubeProgrammer.
Example command (adjust paths as needed):
sftp pi@pi-3dprinter:~/klipper/out/klipper.bin .Disassembling the Printer and Flashing the Firmware
Accessing the Mainboard
The mainboard is located at the bottom of the printer. We need to remove several panels to access it.
Disassembly Steps:
- Tip the printer to the side opposite the SD card slot (SD slot should face the ceiling)
- Remove right side panel (the one with the SD card slot)
- Carefully unscrew the front panel (with the display)
- ⚠️ Don’t fully remove it - cables are still attached
- Keep it loosely attached, we only need enough space to slide out the bottom panel
- Remove the bottom panel to access the mainboard
Disconnect the Screen:
- Locate the screen ribbon cable (see image below)
- Lift the small latch to release the cable
- Remove the cable
Note: Klipper doesn’t support using the screen, so it must remain disconnected.
Connecting the ST-LinkV2
SWD Header Pinout:
The mainboard has a 4-pin SWD (Serial Wire Debug) header:
| Pin | Function |
|---|---|
| VCC | 3.3V power |
| GND | Ground |
| SWDIO | Serial wire data input/output |
| SWCLK | Serial wire clock |
Wiring Diagram:
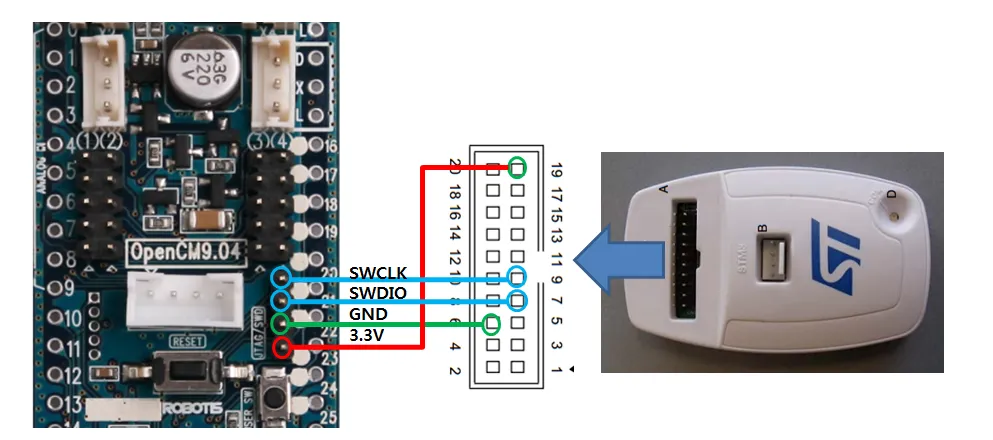
Note: This is an image I found on the Internet. The board on the right is completely wrong, but the ST-LinkV2 pin labels are correct.
Programming the Firmware
Launch STM32CubeProgrammer:
- Connect the ST-LinkV2 to your computer via USB
- Launch the programmer (on Linux):
sudo ~/STMicroelectronics/STM32Cube/STM32CubeProgrammer/bin/STM32CubeProgrammerLinux Note: Running as
sudomay be necessary for USB access. For more proper use, consider setting up proper udev rules.
Connect to the Board:
- Hold the printer reset button (next to the SD card slot)
- Click “Connect” in STM32CubeProgrammer
- Release the reset button
- Verify successful connection
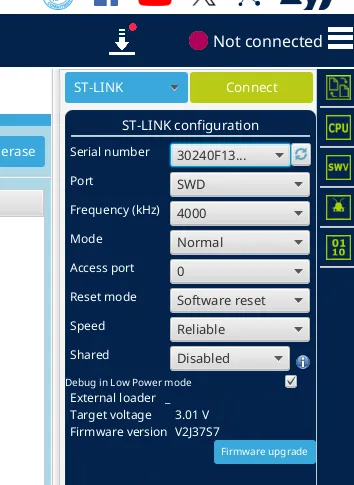
Flash the Firmware:
- Navigate to the “Erase & Program” tab
- Select the
klipper.binfile - Set start address to:
0x08000000 - Click “Start Programming”
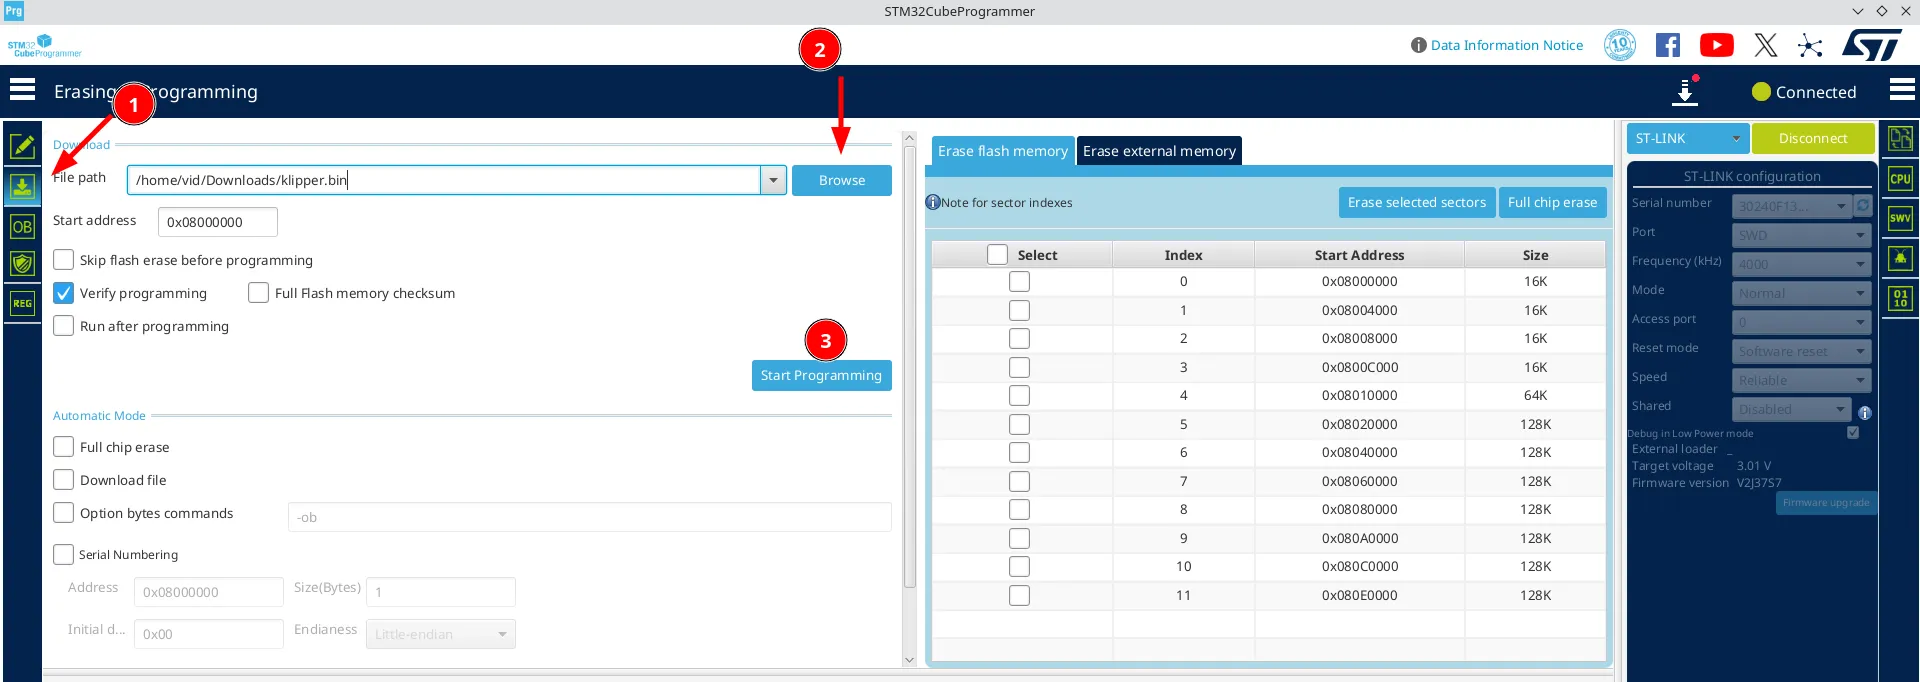
Programming takes a few seconds. Once complete:
- Disconnect the ST-LinkV2
- Reassemble the printer (⚠️ keep the screen cable disconnected)
- Connect the Raspberry Pi to the printer via USB A-to-B cable
Configuring Klipper
Copy Configuration File
Copy Evil’s FFCP2 configuration to your Klipper config directory:
cp ~/klipper/config/printer-flashforge-creator-pro2.cfg ~/printer_data/config/printer.cfgThen append the macros from ~/klipper/config/printer-flashforge-creator-pro2-macros.cfg to the end of the same file:
cat ~/klipper/config/printer-flashforge-creator-pro2-macros.cfg >> ~/printer_data/config/printer.cfgThis file includes macros such as START_PRINT and END_PRINT that will be used later.
One of the macros (SET_LEFT_ADJUSTMENTS) might be missing two parantheses. Ensure the code for the macro looks like this:
[gcode_macro SET_LEFT_ADJUSTMENTS]
gcode:
    {% if params.OP|lower == 'revert' %}
        SET_GCODE_OFFSET X_ADJUST={(-printer["gcode_macro _FFCP2_CONFIG"].left_nozzle_adjust_x|float)}
        SET_GCODE_OFFSET Y_ADJUST={(-printer["gcode_macro _FFCP2_CONFIG"].left_nozzle_adjust_y|float)}
        SET_GCODE_OFFSET Z_ADJUST={(-printer["gcode_macro _FFCP2_CONFIG"].left_nozzle_adjust_z|float)}
    {% else %}
        SET_GCODE_OFFSET X_ADJUST={(printer["gcode_macro _FFCP2_CONFIG"].left_nozzle_adjust_x|float)}
        SET_GCODE_OFFSET Y_ADJUST={(printer["gcode_macro _FFCP2_CONFIG"].left_nozzle_adjust_y|float)}
        SET_GCODE_OFFSET Z_ADJUST={(printer["gcode_macro _FFCP2_CONFIG"].left_nozzle_adjust_z|float)}
    {% endif %}
(In the last two lines of the else part, the opening parantheses were missing in Evil’s original file.)
Identify the Serial Port
With the printer powered on, list connected USB devices:
ls /dev/serial/by-id/Example output:
usb-Klipper_stm32f407xx_370028001150304235313820-if00The full serial path would be:
/dev/serial/by-id/usb-Klipper_stm32f407xx_370028001150304235313820-if00Update printer.cfg
In ~/printer_data/config/printer.cfg, add an incljude for mainsail.cfg and set the correct serial port:
[include mainsail.cfg]  # Include Mainsail configuration

[mcu]
serial: /dev/serial/by-id/usb-Klipper_stm32f407xx_370028001150304235313820-if00  # Your serial port

# ... rest of config
Save and Restart Klipper:
- Save the file
- Restart Klipper from the Mainsail web interface (
http://your-hostname.local/, e.g.,http://pi-3dprinter.local/, or your Raspberry Pi’s IP address) - If everything is correct, you should see the printer connected:
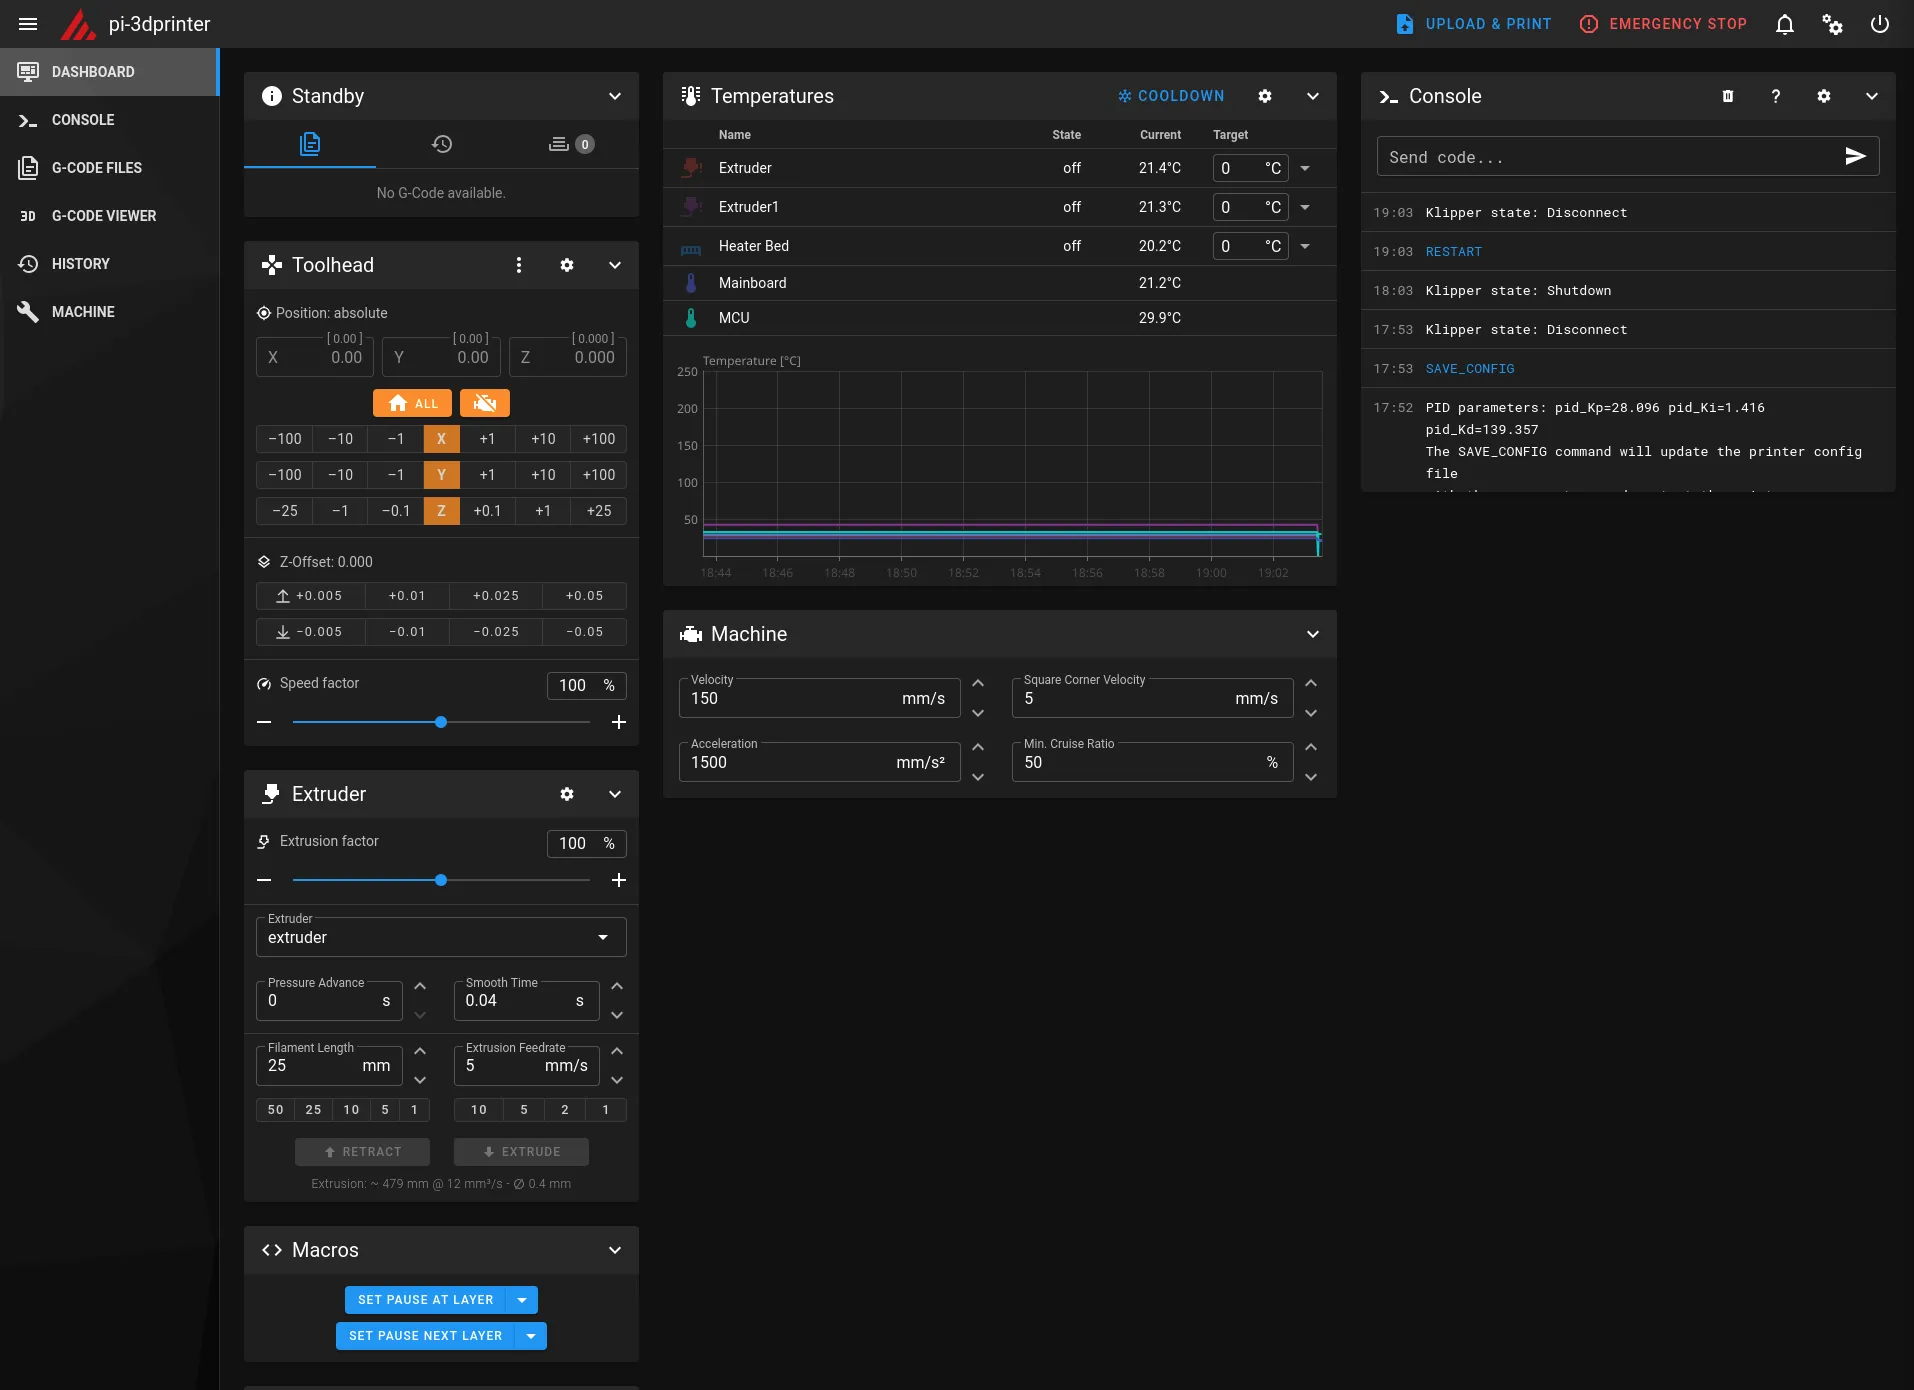
PID Calibration
PID calibration optimizes temperature control for more stable heating.
Calibrate the Heated Bed
In the Mainsail web interface, open the console and run:
PID_CALIBRATE HEATER=heater_bed TARGET=60What happens:
- The bed heats to 60°C multiple times, which takes several minutes
- Klipper measures thermal behavior (you can see waves on the temperature graph, see image)
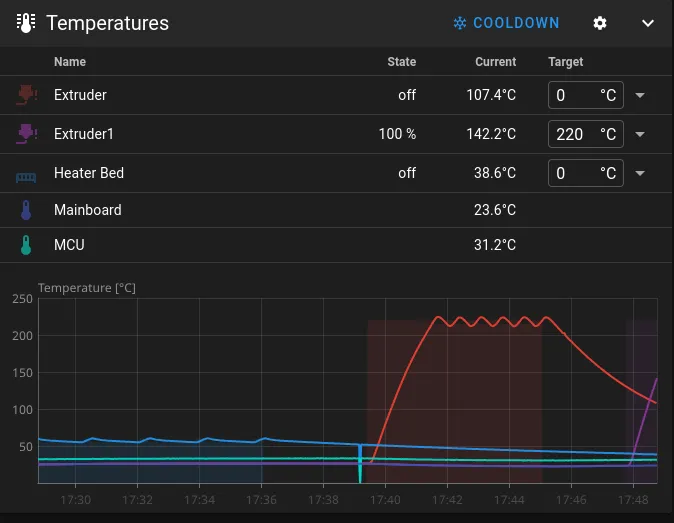
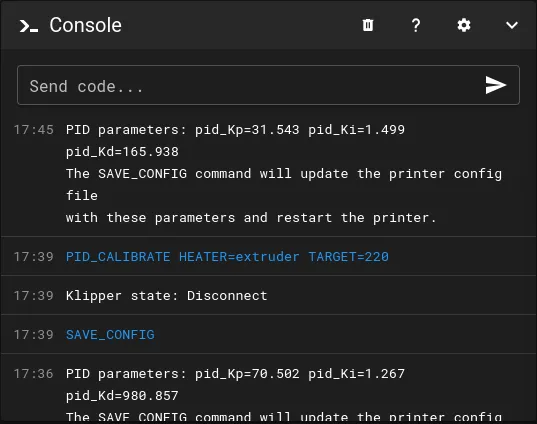
- PID parameters are calculated and displayed in the console
- run
SAVE_CONFIGto have Klipper automatically save them to the config file
Calibrate the Extruders
Repeat the process for both extruders:
Extruder 1:
PID_CALIBRATE HEATER=extruder TARGET=220
SAVE_CONFIG
Extruder 2:
PID_CALIBRATE HEATER=extruder1 TARGET=220
SAVE_CONFIG
Z-axis Calibration
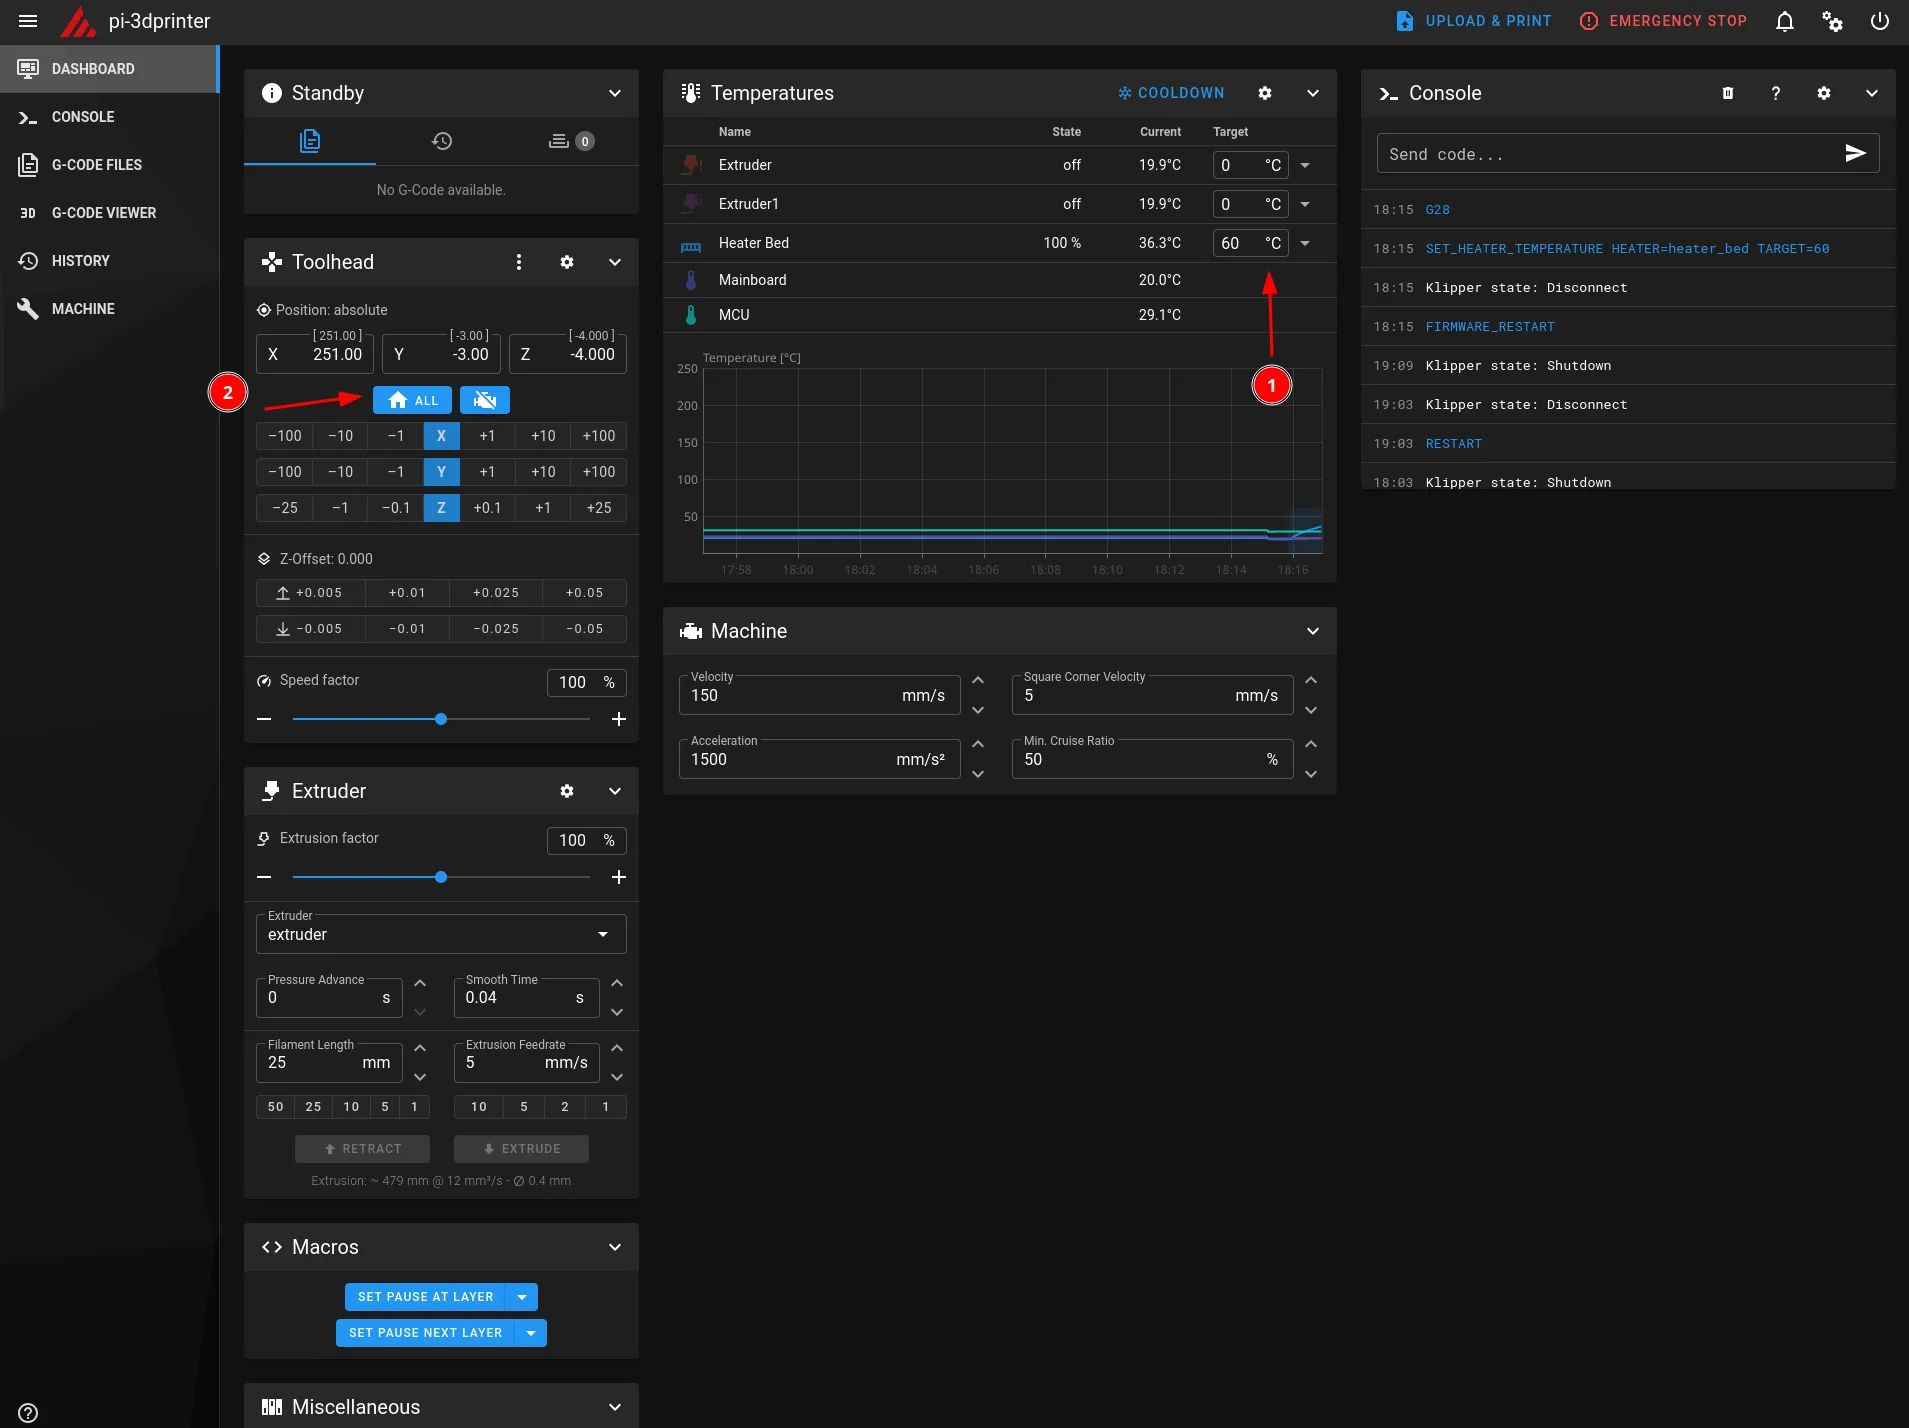
Heat up the bed, I did it to 60°C. You can do it by entering 60 into the Heater Bed temperature field. Then home all axes by clicking the “Home All” button with the house icon. This will move the extruders to the edge and all the way to the front and the bed all the way up.
Slicing Software
For slicing I’ll use UltiMaker Cura, mostly because Evil also uses it in his guide.
On Linux you can download the AppImage from https://ultimaker.com/software/ultimaker-cura/#downloads, or grab it from GitHub. If the AppImage won’t start (it didn’t for me on Debian 13), use the workaround from here: https://github.com/Ultimaker/Cura/issues/19837#issuecomment-3148695909
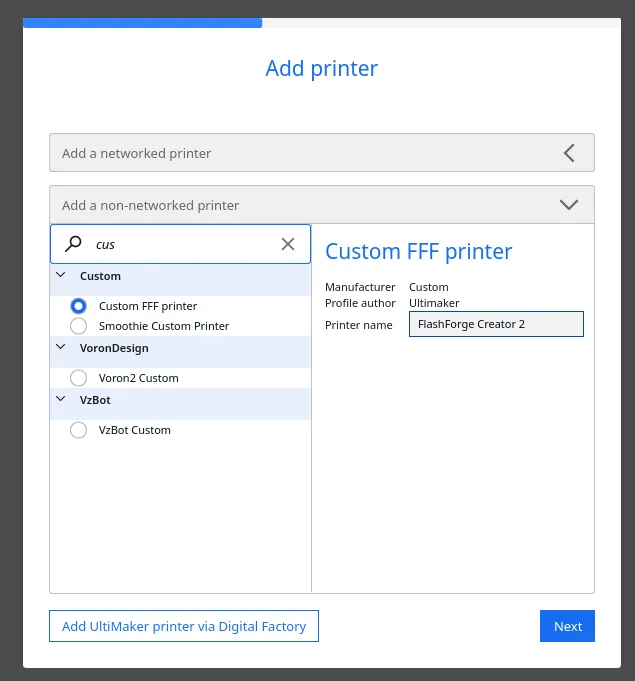
Adding the printer in Cura:
- Add new printer → Non-Ultimaker printer → Custom → Custom FFF printer
- Give it a name
- Click Add
Printer configuration:
Change these settings from the defaults:
- X (Width): 198 mm
- Y (Depth): 150 mm
- Z (Height): 150 mm
- Heated bed: Yes
- Number of extruders: 2
- Start G-code:
START_PRINT BED_TEMP={material_bed_temperature_layer_0} START_EXTRUDER={initial_extruder_nr} EXTRUDER_TEMP={material_print_temperature_layer_0} IDEX_MODE={idex_mode}- End G-code:
END_PRINT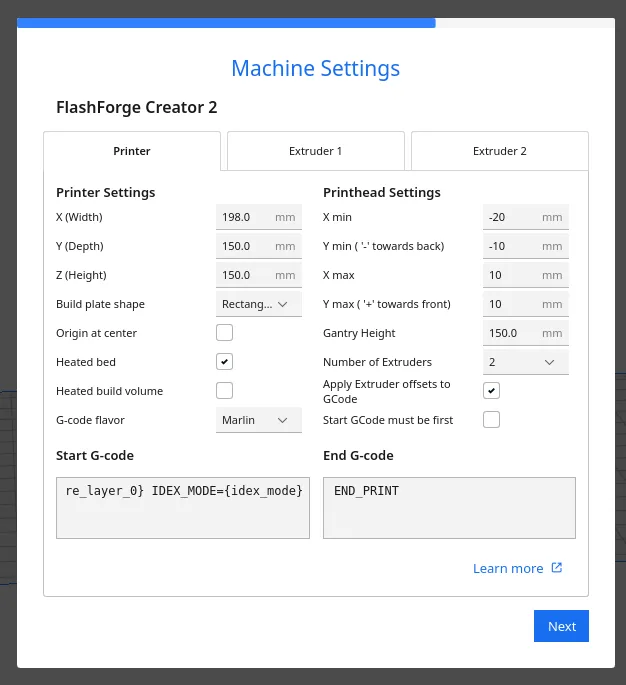
In both extruder tabs, set “Compatible material diameter” to 1.75 mm.
Installing the Cura-IDEX plugin:
- Download the zip from https://github.com/Life0fBrian/Cura-IDEX-mode-plugin
- Extract it to
~/.local/share/cura/VERSION/plugins(replaceVERSIONwith your Cura version, e.g.,5.11) - Restart Cura
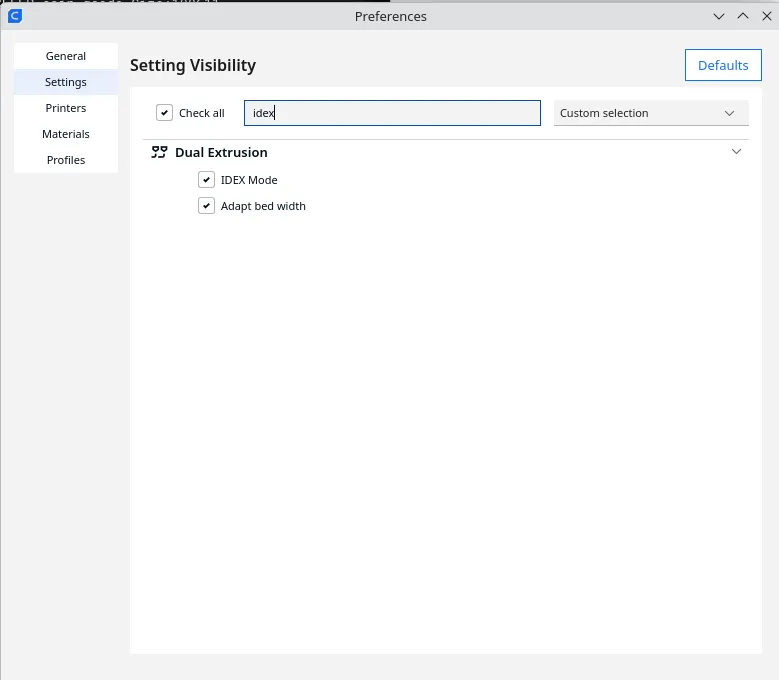
- Go to Preferences → Configure Cura → Settings and search for “IDEX”
- Enable both options that appear (“IDEX Mode” and “Adapt bed width”)
- In the Print settings, click “Show Custom”—you should now see “IDEX Mode” under Dual Extrusion
Usage
Extruder naming:
Klipper:
extruder= right extruderextruder1= left extruder
Cura:
Extruder 1= right extruderExtruder 2= left extruder